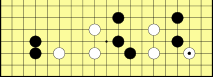
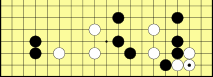
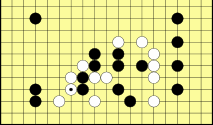
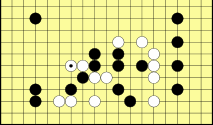
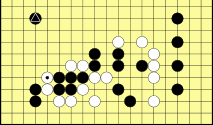
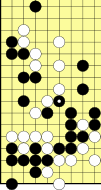
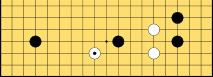
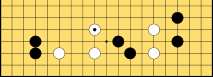
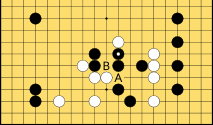
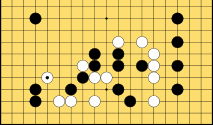
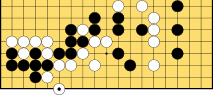
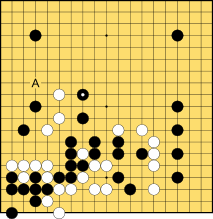
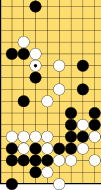
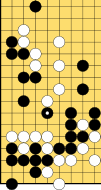
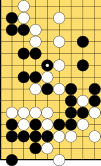
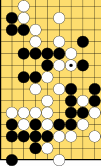
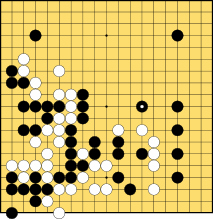
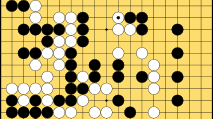
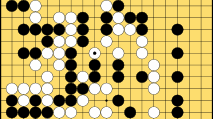
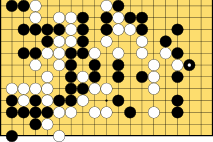
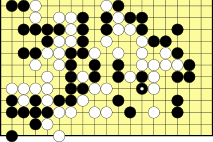
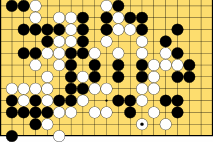
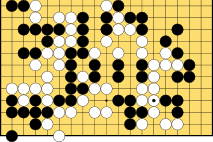
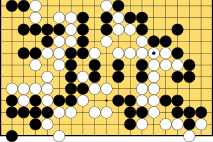
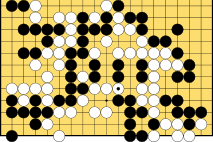
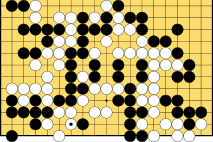
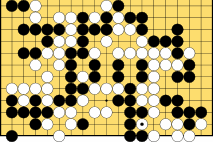
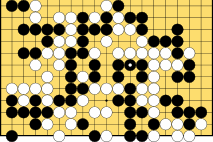
This 6 stone handicap game game was played on KGS (Internet Go Server) on the 26th April 2009. It shows that if Black focuses on keeping White
small and constrained,
than 'make terriory', then White has to fight most of the time. "Ah", you might say -
Dans are
at fighting. Is it not better to just play safe and avoid fights?
A good point, but the White 'fight' in this game is more of a fight for survival. By containing White, he struggles to make
life, and careful defence will give you all the territory you need.
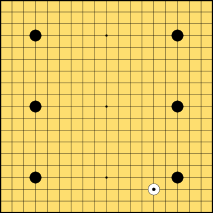 |
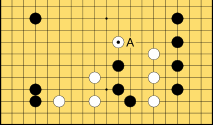
1. White makes the most common high handicap opening move - a low approach to on of the corners.
Many kyu players would be tempted to follow corner joseki, and play a corner joseki. But this is exactly what White wants.
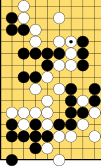
|
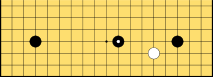 |
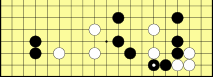
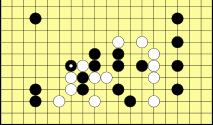
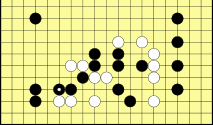
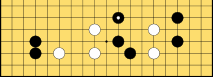
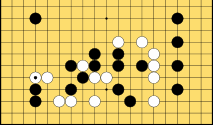
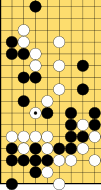
2. Black pincers White, aiming to limit the space he can make on the side.
|
 |
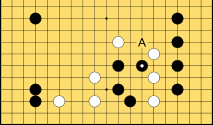
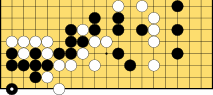
3. One of the key things that White should aim to do in a high handicap game is to have some central influence.
He should avoid being trapped on the sides. Essentially, this move strengthens White, and creates future potentials. He does not
immediately need to make eye-space on the side.
|
 |
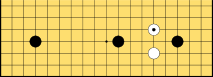
4. Black strengthens his corner, but in a way that keeps the pressure on the last White move. White can move into the corner
now, but may want to defer this until after his next move - a pincer.
|
 |
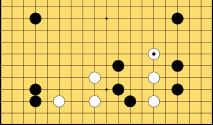
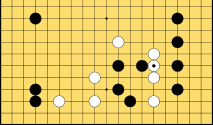
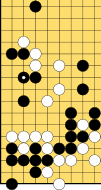
5. The pincer here looks to put pressure on Black. But it invites Black to keep White in 2 separate groups. This may be the start
of White's difficulties - failing to secure an early base.
|
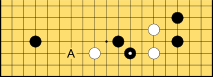 |
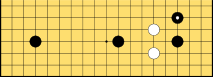
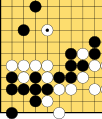
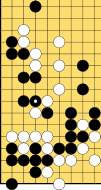
6. Black does indeed keep White separated - a good policy for Black in a high handicap game. But maybe better to squeeze White at A -
it would be slow and painful for White to connect underneath the middle Black stone.
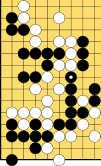
|
 |
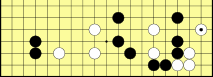
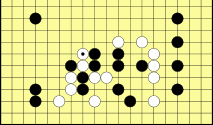
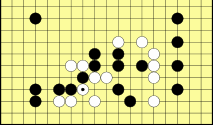
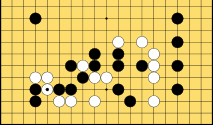
7. White makes good shape on the side, and threatens to slide into the corner. Now, the 2 Black stones
are an easier target for White to attack. However, a group sandwiched between 2 others can run away faster.
|
 |
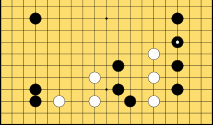
8. The iron pillar. A solid block against the White slide into the corner.
White is forced to extend to the centre - there is not enough space on the side for 2 eyes.
|
 |
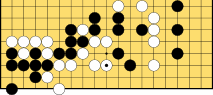
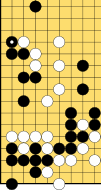
9. When White extends, he makes better space for 2 eyes, and puts pressure back on the 2 Black stones.
|
 |
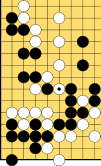
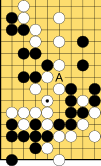
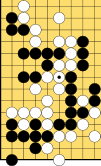
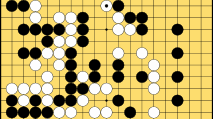
10. However, by extending here, both White groups are kept separated. White would look at the following sequence,
but reject it for now as it gains too little :
|
 |
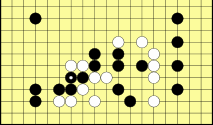
11. Instead, White extends once more. This makes a right side move more feasible, and keeps up the pressure on the lower central Black group.
|
 |
12. Black snuffs the future right side move, securing a nice moyo as he keeps White constrained to a central column.
Note that it is not yet territory - 4th line stones prone to attack.
|
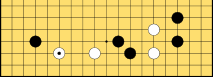
 |
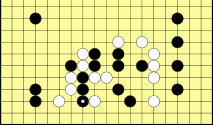
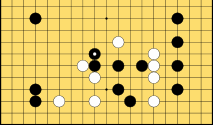
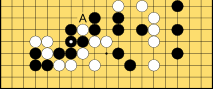
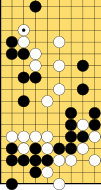
13. After extending to safety along side a similarly running opponent group, the leading player will
look to turn towards the enemy stones, rather than go straight ahead. This is what White does. But I feel that A is
better - this looks too weak a link.
|
 |
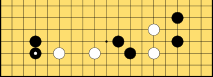
14. Before leaning left, Black strengthens by peeking at the gap in the White position on the right.
This, alas, also serves to strengthen White, so is not a vital move just now. Better, I feel, to push White against the Black wall on the
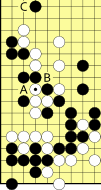
right by playing at A. This illustrates the weakness of White's last move.
|
 |
15. White blocks. He is too close to Black strength on the right to do little else.
|
 |
16. Black stretches out with good shape, and keeps the two White groups well apart. Black is playing well.
Notice that he is not aiming to make territory directly - his profit will come in the attack on White.
|
 |
17. White looks to squeeze Black - containing him between his 2 groups. But this is too much
to hope for, so White must defend after Black does.
|
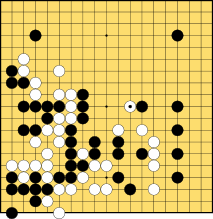
 |
18. Black chooses a good shape, rather than cutting the White position. In addition, he keeps the White
grpups separated.
|
 |
19. When White makes this push into the Black position, he also strengthens his position a little. A nice combination
of attack and defence, generally the best kind of move to make.
|
 |
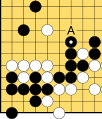
20. This is a beautiful move. As it strengthens Black, it puts pressure back onto the right side White group.
If White now plays at A, Black simple blocks to the right. If Black had played this move at A, then White would cut Black apart
by pushing through at B. Nasty..
|
 |
21. White desparately wants to tidy up his shape on the left, but is obliged to defend on the right as
a result of Black 20. Black now has sente (the initiative).
|
 |
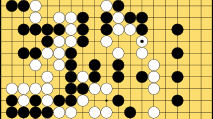
22. Black takes sente with both hands and hits hard right into the heart of the White position. Note that the
direct cut, tempting though it is, does not work :
|
 |
23. White tries to rescue his broken shape. He does not directly defend the cut.
|
 |
24. Black must ensure that his invading stone can escape, and so cuts immediately, and .
|
 |
25. White threatens to atari the Black stone downwards - this move completes the capture in a ladder.
White might think about extending as below, but misses out on capture because of the marked Black stone :
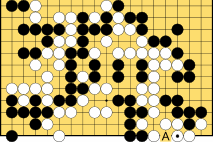
However, White should not despair and after one more atari, can be happy with his position,
sacrificing the 2 stones to get a position that puts pressure on the corner Black stones :
|
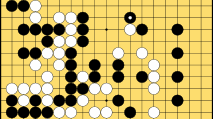
 |
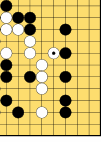
26. Black secures his stones. Simple, but solid, as a professional would likely play, the stone
safe in a ladder. Good Go is often about solid play - not about overstretching to try to squeeze ever more
from your opponent. Overstretching often causes your position to collapse due to poor shape.
|
 |
27. White overstretches a little - hoping to capture the corner with this attachment. He has to take
risks however, since he is thin here amongst Black strength.
|
 |
28. Black tries to keep White separated. He can do so, but his corner is weakened.
|
 |
29. White blocks.
|
 |
30. Black cuts and White is now separated into 3 groups. This is very bad for White. However, if he
can kill the Black corner, then 2 of his groups will live.
|
 |
31. Before attacking the corner, White can make muich better shape by this atari. Black is obliged to respond.
|
 |
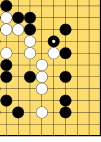
32. Much better for Black to settle his position by capturing the stone. With the stone still there, White can (and does) later play
on it by setting up a ladder break to gain leverage on the left.
break.
|
  |
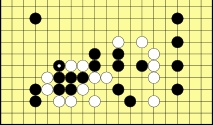
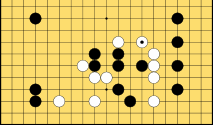
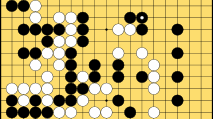
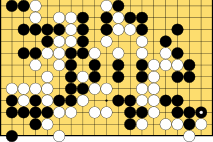
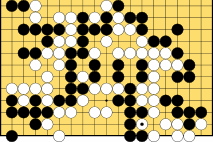
33-40. White and Black contest the corner boundary.
|
  |
|
  |
|
  |
|
 |
41. Notice now the effect of the White pressure here - he secures a stronger shape for his weak group here. However,
it is not quite alive yet.
|
 |
42. Nor is Black - he has to play here to create life in the corner.
|
 |
43. White makes a live shape on the lower side. This again gives Black sente. One of the key
methods for White to play in a high handicap game is to hold onto sente as long as possible. He has
released sente allowing Black to hit the left side group hard.
|
 |
44. Black is in control of the game - he has split White into 3 groups, only one of which is alive.
His groups are all safe, at least for now, so he can go on the offensive without fear. Hence this solid
attacking move.
|
 |
45. Now we see why Black might have done better in capturing the single White stone. White extends
here in a way that threatens to release that stone - his move is a ladder breaker.
|
 |
46. Black is overly cautious. Better to play at A, and put severe pressure on White.
|
 |
47. White looks to escape - this small move is required in order to avoid being cut by Black.
|
 |
48. Black extends solidly from his position. Notice that he again sticks to the simple principle
of keeping the 2 White groups separated.
|
 |
49. White extends further, again with good shape. Now, he is looking to put pressure on the
2 Black stones on the left.
|
 |
50. Black misses the much better move at A. He does not need to extend here, as he can press
on the White group to the right, and save his left side position. However, Black A does keep the game much simpler,
giving White a bigger problem with his right side group.
|
 |
51. Often, in Go, the best place for one player is the best for the other. So it is here, as White puts
the squeeze on the two Black stones as his route to safety.
|
  |
52-53. Black feels obliged to save these stones here, and the scramble for life kicks in.
|
  |
54-55. Black gradually carves out some eye shape, at the expense of being wrapped around by White. But the
influence White gets is neutralised by the central Black group.
|
  |
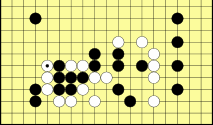
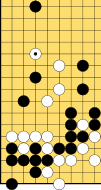
56-57. After Black settles his position, White makes good his shape. Note, of course, that White has merely struggled to live,
gaining no territory in the process.
|
  |
58-59. One final bit of shape settling - Black can do this without losing sente, so safe.
|
 |
60. Sente in hand, Black can now squeeze White further. He cannot and does not isolate the stones below,
but does keep White very narrow, as well as impriving his own shape even further.
|
  |
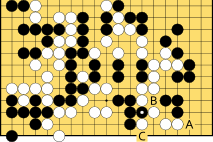
61-62. White cross cuts of course - the only move - and Black makes good shape in forcing White to
keep his connection to the upper side stones with this atari. If Black tries to cut White away from his
upper side stones, he damages his shape :
If Black defends at B, White cuts at A. White can secure the upper side stones by attacking the corner,
maybe starting at C.
|
  |
63-64. White must make the atari, and Black looks to force White to capture.
|
 |
65. White captures. Whilst this looks like the 'correct' way to play, remiving bad aji, he does not have to take,
and I think he would be better off by playing at A. You will see later that Black can threaten a cut at A as a way of
making good his shape.
|
  |
66-67. Black can cut into White here. White ataris back.
|
  |
68-69. After Black joins, White has some fast patching up to do. Notice how Black has retained sente the most in this
game. By keeping White constrained in small groups, Black can worry about making profit later.
|
  |
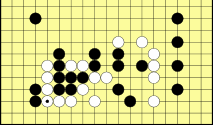
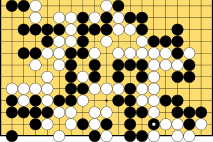
70-71. Both players tidy up their shape. But notice how powerful the Black wall is now, at this half way point in the
game. Ready to move to the right side of the board ...
|
  |
72-73. Before though, Black has one more forcing move - remember the threat I mentioned before? White has to defend - yet again on
the back foot in this game.
|
 |
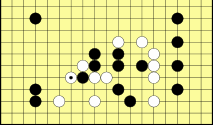
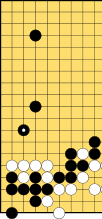
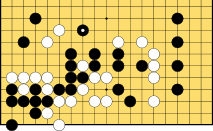
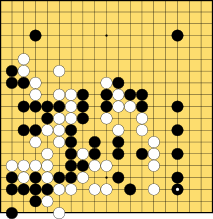
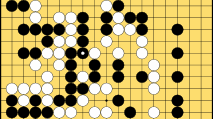
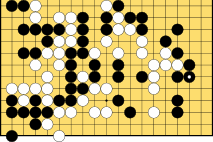
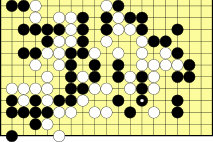
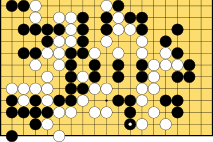
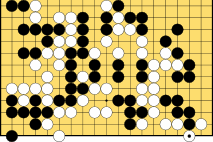
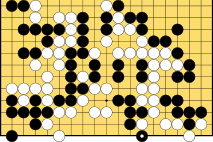
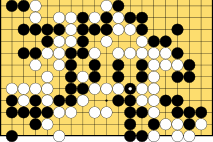
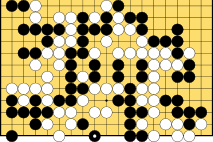
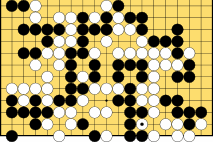
74. Looking at the whole board, we can now see the power of the Black wall.
Black starts capping the White group, and White will now have to struggle once again simply to survive.
Even if he does, Black will likely gain a lot of profit in the process.
Indirect acquisition of territory via the threat to kill is a fundamental Go strategy. Many beginners feel that the
only aim is to kill, and feel it a disaster if the opponent escapes. Next time, look at what you
can gain in the attacking process.
|
 |
75. White looks to run away. There is some room on the lower side to get an eye, or possibly 2, but
for now White chooses to squeeze back on the large central Black group first. This should fail because Black is simply
too strong.
|
 |
76. Black caps in order to try to contain White.
|
 |
77. White extends in good shape, securing half an eye below.
|
 |
78. Black has been patient the whole game, sticking to fundamentals very well. He does so here, making solid shape
and reducing the opportunity for White to atari his way out.
|
 |
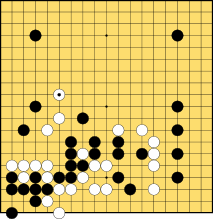
79. White stretches upwards, but is in danger of running into Black's powerful wall.
|
 |
80. Black hanes (attaches via a diagonal connection), knowing that it is risk for White to also hane.
|
 |
81. But White does hane, hoping to slip out here, towards the safety of his nearby stones. But this is a
misjudgement - Black can safely cut.
|
 |
82. Black cuts, and White must scrabble for 2 eyes now.
|
 |
83. He makes some shape here with this threat to capture the Black cutting stone.
|
 |
84. But Black defends with a solid bamboo joint.
|
 |
85. White makes good shape and 3/4 of an eye. This also looks to spread to the right in search of escape or a 2nd eye.
|
 |
86. Black pre-empts White's lower side expansion with his solid block. Note that Black has rarely looked to make territorial
only moves in this game. His sustained attacks on the 3 White groups has yielded enough profit. White lags badly in territorial terms.
|
 |
87. White squeezes the Black group further with this peek. Black has to reply.
|
 |
88. After Black blocks, the fight for life between these two large groups becomes much closer.
|
  |
89-90. White now pushes on the Black weaknesses on the right. And Black blocks. Black has to be careful, but
even if White lives, Black is still ahead.
|
 |
91. White can push further, creating a weakness in Black's shape that he will need to fix.
|
 |
92. Black ataris.
|
 |
93. White defends, but does not lose sente as Black has to defend also.
|
 |
94. Black has lost sente for a while now, but has secured a very solid chunk of profit on the rights. Try
to keep in mind this other side to an attacking sequence.
|
 |
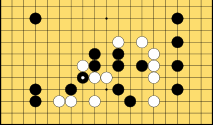
95. White peeks into the weakest part of the Black position. Even so, Black remains stronger than White.
White missed an opportunity here :
 |
White threatens to make an eye ... |
 |
... which Black must stop ... |
 |
... so White can go on an atari spree ... |
 |
 |
 |
 |
And Black cannot both stop the 2 White groups linking at A, or the marked Black group
dying by White at B. Note that this was just one sequence. But after the 1st 2 moves above,
White can still play the actual move 95 above, but in a better position.
|
 |
96. Black defends in good shape again - a hallmark of his play. he may be a kyu player, but his patience, and
correctness of technique is like that of a professional.
|
 |
97. White spreads on the lower side in search of a 2nd eye.
|
 |
98. Black first responds here - threatening to split the White position in two.
|
 |
99. White detects this of course, but his defence merely forces Black to make another bamboo joint.
|
 |
100. Black defends soundly. He could barely do anything else. This also
weakens the potential eye above. Back to 1/2 an eye now.
|
 |
101. White spreads out on the lower side in search of an eye.
|
 |
102. And Black must constrain him - he must not let his middle group get too weak.
|
 |
103. White spreads to the right, and has half an eye again. This is a recurring theme for White,
constrained all the time by wise play by Black.
|
 |
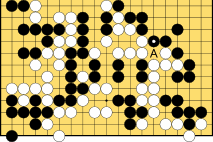
104. Before blocking on the right at A, Black plays a great tesuji. Not only does White have to stop
Black cutting his stones apart at B, but it also sets up the atari at C. Great move!
|
 |
105. White has to block the cut. The only move.
|
 |
106. And now Black can stop White's eye-making spread on the right.
|
 |
107. White plays in the hope of getting more liberties and possibly the much required 2nd eye here. But
this is merely thrashing around, in my opinion.
|
 |
108. Black plays true to form and makes good shape.
|
 |
109. White connects underneath but is no closer to a 2nd eye.
|
 |
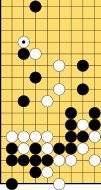
110. And Black stops White making an eye.
|
 |
111. White has sente now, a rarity in this game. He has to make sure he gets this eye (Black here would stop him)
because he cannot get 2 on the lower side.
|
 |
112. Another tesuji for Black, although the 'eye' he kills here is only meaningful if White got another on
the lower side.
|
 |
113. White has to defend against the cut. White is on the back foot again.
|
 |
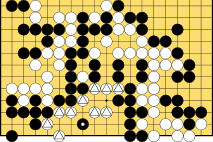
114. Now the game hots up - Black making an eye killing atari ...
|
 |
115. ... which forces White to set up a ko fight for life. A ko is a repeating board position.
When Black captures, White cannot immediately capture back. He will have to play elsewhere
before doing so.
|
 |
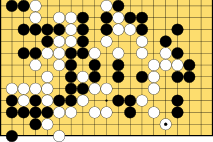
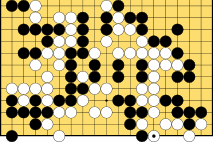
116. Winning this ko is of course the only way that White can create an eye here and survive.
However, Black is well ahead even if White survives, so it is much less critical for Black.
|
 |
117. White plays a forcing move to win the ko back.
|
 |
118. Black must defend against the atari.
|
 |
119. White takes the ko back.
|
 |
120. Now, Black can afford to join - White needs to play at both A and B in order to make the eye here.
|
 |
121. White makes the first of these crucial moves to try to make the eye at A ...
|
 |
122. ... so Black takes the ko back.
|
 |
123. White plays to separate Blacks' stones.
|
 |
124. And Black of course blocks.
|
 |
125. White takes the ko back.
|
 |
126. But Black deals White another death blow with this fine tesuji, severely weakening the marked White stones.
And, additionally, setting up lots more ko threats.
|
 |
127. White defends with the dreaded empty triangle. About all he could do here for now though.
|
 |
128. And Black takes the ko back, of course.
|
 |
129. Now White can play one of the few remaining big ko threats on Black.
|
 |
130. Black defends the atari. But he probably does not need to - if White captures, he cannot make another eye here.
|
 |
131. And White takes the ko back.
|
 |
132. Black sets up multiple threats with this move, forcing White to respond.
|
 |
133. White blocks.
|
 |
134. And Black has the ko.
|
 |
135. Another forcing move from White.
|
 |
136. Which Black must respond to.
|
 |
137. Allowing White to retake the ko for the last time.
|
 |
138. Black looks to link up.
|
 |
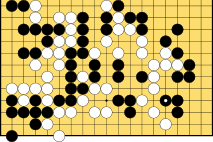
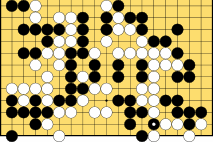
139. White counter ataris, but it has all fallen apart for White ...
|
 |
140. ... so after Black retakes the ko, White then resigns. A massive whitewash win for a very powerful 2kyu player.
|